Step 3: Address Information
This is third step of creating new account in MPSC Online Application System.
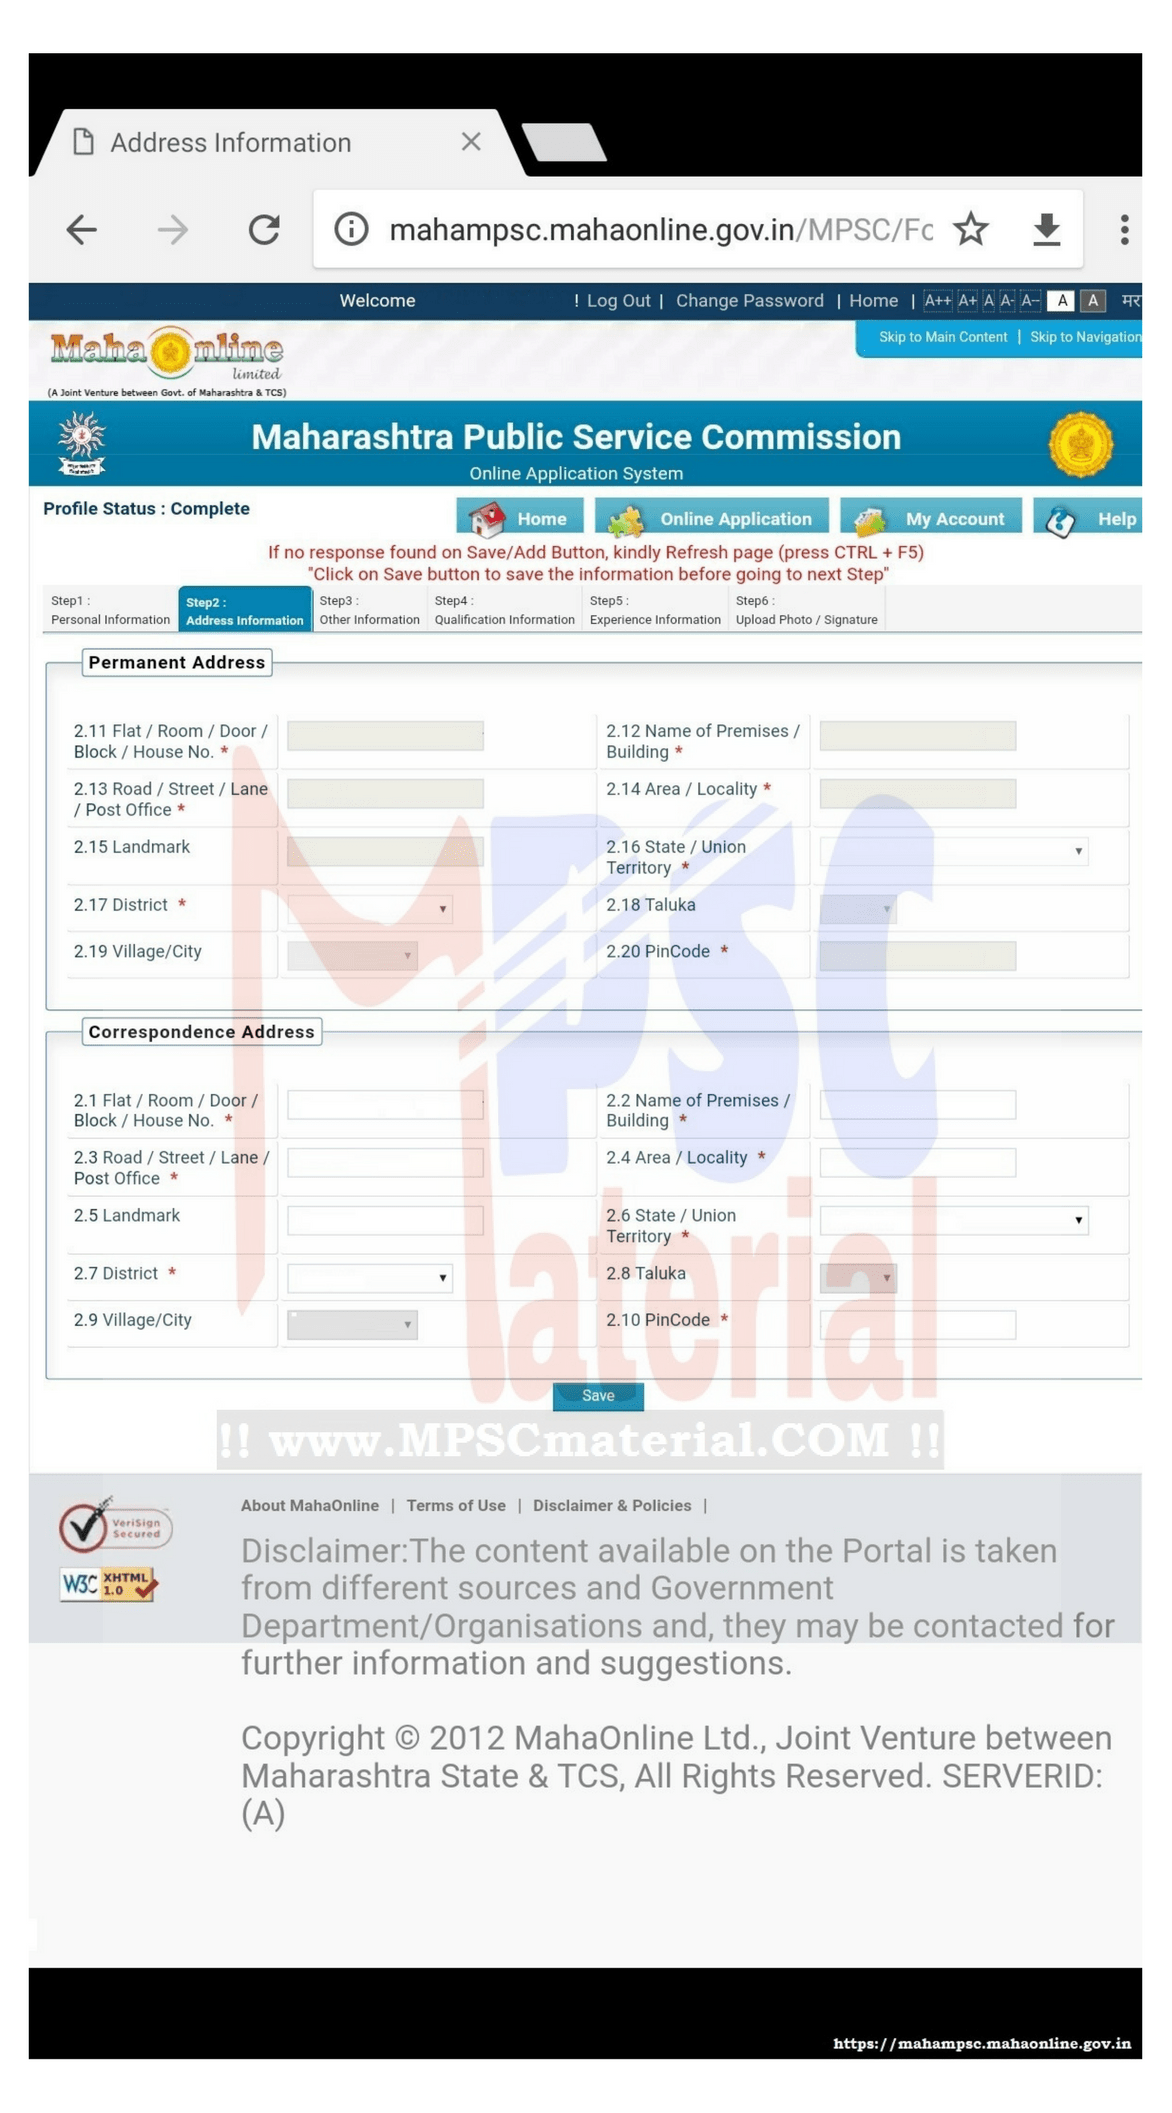
Welcome to MPSC Material and you are reading third step of Creating New account in MPSC Online Application System.
So, this is Step 3 and in this step we are going to add an address in our MPSC Online Account. This is the simple step to fill the information about our address.
As we know that we may have one permanent address or we may have to addresses one is permanent and another one is temporary or correspondence address. So, in this step we are going to add same.
So, let’s get started.
Before that first see what type of information we have to add as address in MPSC Online Application System.
Note: If you do not have two addresses then please check that checkbox which says “Is Permanent Address the same as Correspondence Address?”
In Permanent Address you will have to add following details:
2.11 Flat / Room / Door / Block / House No.*:
2.12 Name of Premises / Building*:
2.13 Road / Street / Lane / Post Office*:
2.14 Area / Locality*:
2.15 Landmark:
2.16 State / Union Territory *:
2.17 District *:
2.18 Taluka:
2.19 Village/City:
2.20 Pin Code *:
In Correspondence/Temporary Address you will have to add same details as permanent address
2.1 Flat / Room / Door / Block / House No. *:
2.2 Name of Premises / Building *:
2.3 Road / Street / Lane / Post Office *:
2.4 Area / Locality *:
2.5 Landmark:
2.6 State / Union Territory *:
2.7 District *:
2.8 Taluka :
2.9 Village/City:
2.10 Pin Code *:
Let’s see the point by point explanation of each and every point.
2.11 Flat / Room / Door / Block / House No.*: Enter your Flat Number or Room Number or Door Number or Block Number or House Number. Depending on your location you can add anyone from the list.
2.12 Name of Premises / Building*: Name of the Building or Premises.
2.13 Road / Street / Lane / Post Office*: Road Near you or Street or Lane or Post Office Name.
2.14 Area / Locality*: Your Local Area.
2.15 Landmark: If There is landmark near your address then enter it otherwise leave it. Its not mandatory.
2.16 State / Union Territory *:
Select Your State or Union Territory from the list:
- ANDAMAN & NIKOBAR ISLANDS
- ANDHRA PRADESH
- ARUNACHAL PRADESH
- ASSAM
- BIHAR
- CHANDIGARH
- CHHATTISGARH
- DADRA & NAGAR HAVELI
- DAMAN & DIU
- GOA
- GUJARAT
- HARYANA
- HIMACHAL PRADESH
- JAMMU & KASHMIR
- JHARKHAND
- KARNATAKA
- KERALA
- LAKSHADWEEP
- MADHYA PRADESH
- MAHARASHTRA
- MANIPUR
- MEGHALAYA
- MIZORAM
- NAGALAND
- NCT OF DELHI
- ORISSA
- PUDUCHERRY
- PUNJAB
- RAJASTHAN
- SIKKIM
- TAMIL NADU
- Telangana
- TRIPURA
- UTTAR PRADESH
- UTTARAKHAND
- WEST BENGAL
2.17 District *: Select your district if you have selected your state as Maharashtra
- Ahmednagar
- Akola
- Amravati
- Aurangabad
- Beed
- Bhandara
- Buldana
- Chandrapur
- Dhule
- Gadchiroli
- Gondiya
- Hingoli
- Jalgaon
- Jalna
- Kolhapur
- Latur
- Mumbai City
- Mumbai Suburban
- Nagpur
- Nanded
- Nandurbar
- Nashik
- Osmanabad
- Palghar
- Parbhani
- Pune
- Raigarh
- Ratnagiri
- Sangli
- Satara
- Sindhudurg
- Solapur
- Thane
- Wardha
- Washim
- Yavatmal
2.18 Taluka: Select your taluka from the list of talukas of your district.
2.19 Village/City: Select your village or panchayat if village is not available.
2.20 Pin Code *: Enter your Correct 6 digit pin code.
So, this was about Adding Address Information in MPSC Online Application System. So, this is not complicated step because everything is known to everyone.
You know that you are reading 3rd step of MPSC Online Application System. If you want to know about all the steps then all the details is given below. You can read any step from the given below
Step 2: Adding Personal Information
Step 3: Adding Address Information
Step 4: Adding Other Information
Step 5: Adding Qualification Information
Step 6: Adding Experience Information
Step 7: Uploading Photo and Signature
Thank you for reading this whole post and I hope you will not face any problem while filling the MPSC online form. If you get any problem while filling the online form then ask to anyone who knows that or ask us on our social media platform and you will get reply within the time.
If you are on Facebook, Twitter, Instagram, or any other social media where we are present then don’t forget to connect with us. If you have any suggestions then don’t forget to tell us we will appreciate your comment or message and we will try to give our best.